


In our Plastic Injection Moulding Design Guide, we share our latest tips, guidance and best practices for optimising your plastic injection moulding designs. In this comprehensive design guide, you will learn:
The Basics
What is Injection Moulding?
Injection Moulding is a manufacturing process used for manufacturing plastic parts of large volume and capacity through CAD (Computer-Aided Design). Injection Moulding is implemented after the design of the part is finished. An injection mould is created and machined with precision to form the part’s features. The injection moulding is accomplished when a thermoplastic or thermoset material is fed into a heated barrel, mixed and then forced into the metal mould cavity. It then cools and hardens before removal.
{{cta-banner}}
How does the injection moulding process work?
Once a part is designed, a metal mould is precision machined to create the negative of the desired part shape. This can have a single cavity or multiple cavities for the molten plastic to fill. This decision on whether to use single cavity or multiple cavity moulds is largely based on the economics of the mould and the volume of parts required.
The chosen material starts as pellets and is melted down to a liquid before being fed through a heated chamber. Then, the molten plastic flows into the cavity. Injection moulding machines consist of two main parts: injection unit (which pushes the molten material into the mould cavity) and clamping unit (which holds the sides of the mould together).
The part cools very quickly and solidifies into the moulded shape. When the plastic is set, the clamp opens and ejector pins push out the part. You can learn more about the various stages of the injection moulding in our process of injection moulding guide, whilst this video provides an animated breakdown of the injection process.

What is injection moulding used for?
The method of injection moulding is a popular machining process to produce plastic parts used in multiple industries. Injection moulded parts are particularly prominent in consumer plastic products and are suitable for mass production. Common uses for injection moulding include:
- Packaging
- Toys
- Medical equipment
- Electrical appliances
- Automotive parts
Our resource compiling Common Items Made Using Plastic Injection Moulding can be used in order to gain a better understanding of the typical items made using this process.
What are the different types of injection moulding?
There are several types of injection moulding available. Each type has advantages and disadvantages and depends on the application and material of the part.
Thermoplastic Injection Moulding
Thermoplastic Injection Moulding is the most common type of injection moulding, where a thermoplastic polymer is used in the moulding process. The moulds are placed in a hydraulic or electric machine. The injection moulding machine melts the plastic and passes it into the mould at high injection speed. Unlike thermoset plastics, which cool permanently into a solid, thermoplastic materials can be remelted once they’ve cooled.
Thermoset Injection Moulding
Thermoset injection moulding is similar to thermoplastic moulding; however, the thermoset material is injected into the mould as a cold liquid and is permanently cured in the mould through heating. Thermosets cannot be remelted. A good example of a thermoset material is silicone.
Insert Moulding / Overmoulding
Insert moulding and over moulding are injection moulding processes that involve inserting a component into the mould cavity before the injection. The melted plastic material fills the mould around the insert. This can be used to provide aesthetic or ergonomic surface finishes.
Gas Assisted Injection Moulding
Gas-assisted injection moulding is a specific type of injection moulding that is a popular choice for manufacturing high-performance plastic parts. In our gas-assisted injection moulding guide, you can learn more about the gas-assisted injection moulding process.
Metal Injection Moulding
Metal Injection Moulding (often abbreviated to MIM) is a casting process in which a fine metal powder is mixed with a plastic binder material and injected into a mould. This creates what is known as a ‘green part’. The plastic binder is then chemically removed to form a ‘brown part’. The brown part is subsequently sintered to produce the final metal part. However, this guide focuses on plastic injection moulded parts.
Liquid Silicone Rubber Injection Moulding
Liquid silicone rubber injection moulding is a thermoset process that involves mixing and heat-curing two compounds with the help of a platinum catalyst inside the mould to create a silicone part. LSR mouldings are excellent when you need parts with high temperature resistance. It’s also a great option when you need to manufacture complex geometries. The process also offers a significant advantage in terms of the cost of mould tools.
What are the Advantages of Injection Moulding?
✅ Cost-effective at high volumes
The initial cost of the moulding tool is high, but after this investment, the cost per part is very low. Injection moulding can combine manufacturing and finishing in one step, whereas using traditional manufacturing processes such as CNC machining, the finishing is an additional step. CNC machining also cuts a good chunk of the original plastic block or sheet, leading to high scrap rates. This makes high-volume manufacturing using injection moulding very cost-effective as the tool costs are quickly recuperated by the low part costs.
✅ Reliable repeatability
If you are manufacturing the same part repeatedly, injection moulding is an excellent choice as parts can be produced rapidly at a low cost in high volumes. A high-quality mould will have a long tool life (100,000 cycles), and you can typically expect tolerances of ±0.5 mm.
✅ Fast production speeds
Depending on the size and complexity, parts can be manufactured as quickly as 10 seconds. Combining this fast production speed with the ability to produce multiple parts in one mould, you get a much faster production compared to alternative methods like CNC machining.
✅ Material selection
A wide range of materials and unlimited colours are available when using injection moulding. Different combinations of material pellets can be mixed, and reinforcements such as glass fibre can be added to adjust the physical properties of a part. When selecting a material, you need to consider factors like heat resistance, chemical resistance, and dimensional stability. Our resource dedicated to 'Choosing the right injection moulding material' can help you understand the importance of material selection in injection moulding further.
✅ Finished parts in one step
The inside of the tooling mould can be mirror polished to give a super smooth surface finish, bead blasted to provide a textured effect or even engraved text to parts. The great thing about injection moulding is the finishing and manufacturing of the part are done together as opposed to two steps in alternative manufacturing methods.
What are the disadvantages of injection moulding?
❌ High initial investment
The initial tooling costs are high for injection moulding as a custom mould has to be manufactured, which involves a lot of machining and material. Also factored into the cost is the alterations to the tooling required after the T0 (first run) parts have been reviewed. However, once this has been completed, the part cost is very low, and the production speed is high.
❌ Long initial lead time
An injection moulding project's initial design and manufacture time are considerably longer than other manufacturing methods. For example, you could expect a typical injection moulding project to take between 1-2 months before you start manufacturing parts. Using methods such as 3D printing and CNC machining, parts can be machined in days.
❌ Complex design process
Correctly designing a part for injection moulding is very important as having to remake a mould is very costly. For example, designing a part with the correct amount of draft takes time and often requires multiple rounds of prototyping (often 3D printing is used).
Injection Moulding Design Guidelines
When designing parts for injection moulding, there are some key design considerations to bear in mind to ensure successful injection moulding and manufacturing high-quality parts. In this section, we will outline some of the key design considerations to improve the manufacturability of your parts for injection moulding. These design recommendations are summarised below, and we also have a comprehensive look at these guidelines in our design guide.
Wall Thickness
To reduce material costs, aim to use thin walls on your part. Thin walls also benefit from cooling quickly, which can reduce cycle times and costs and increase production rates. However, it’s essential to consider the particular part and its application, as thicker walls provide additional mechanical strength. The recommended wall thickness varies from 0.8 mm - 4 mm. Other thicknesses are achievable depending on material and application.
Wall thickness depends on the material used as material flow rate will influence the minimum wall thickness required. The table below summarises the recommended wall thicknesses for some of the most commonly used materials:
Uniform Walls
Always try to ensure that the walls in your injection moulded part have a consistent wall thickness. This ensures the part cools at a uniform rate and reduces the risk of warping and voids. Avoid large solid areas where possible and replace these with strategically placed ribs and bosses as appropriate. If your parts contain features of varying wall thicknesses, try and make the transition between the two thicknesses as smooth as possible.
.webp)
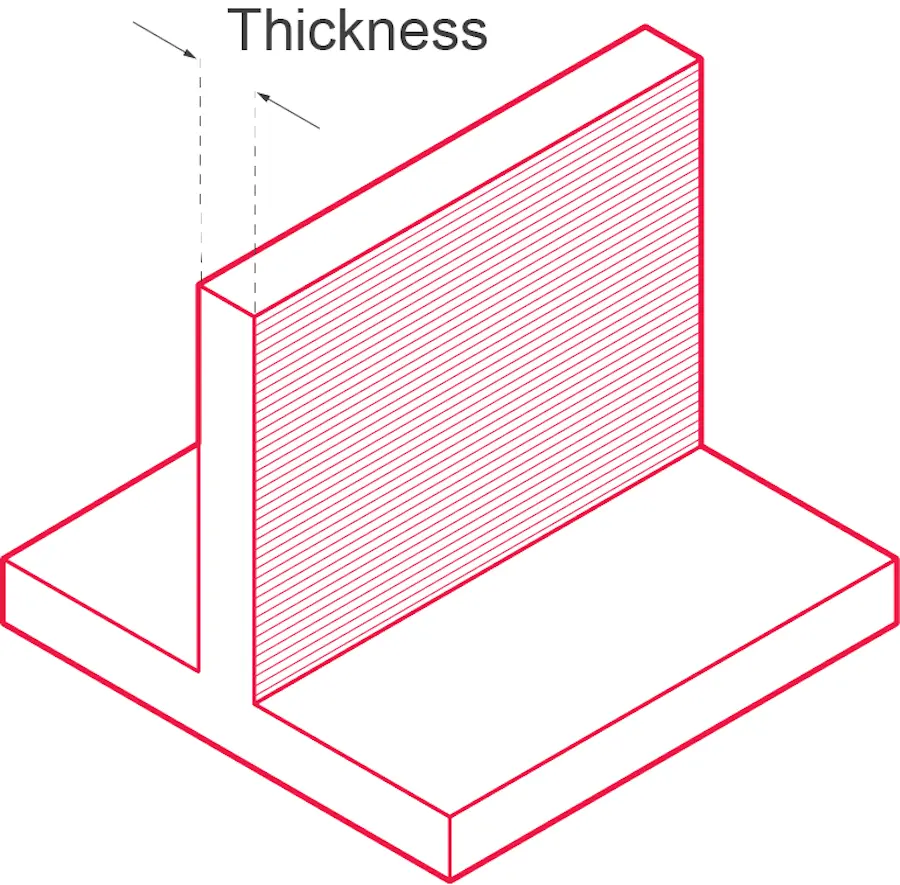
Rib orientation and Height
Ribs are often added to parts to provide additional bending stiffness. If not correctly positioned, the positioning of ribs or any type of protrusion on the main wall can cause non-uniform wall thickness issues. These issues can be reduced if the rib or boss thickness is kept between 50% and 60% of the walls they are attached to or isolated entirely. The rib height should be less than or equal to 3x the rib thickness; multiple ribs can be used to give a greater degree of bending stiffness rather than using a taller rib.
%20(3).webp)

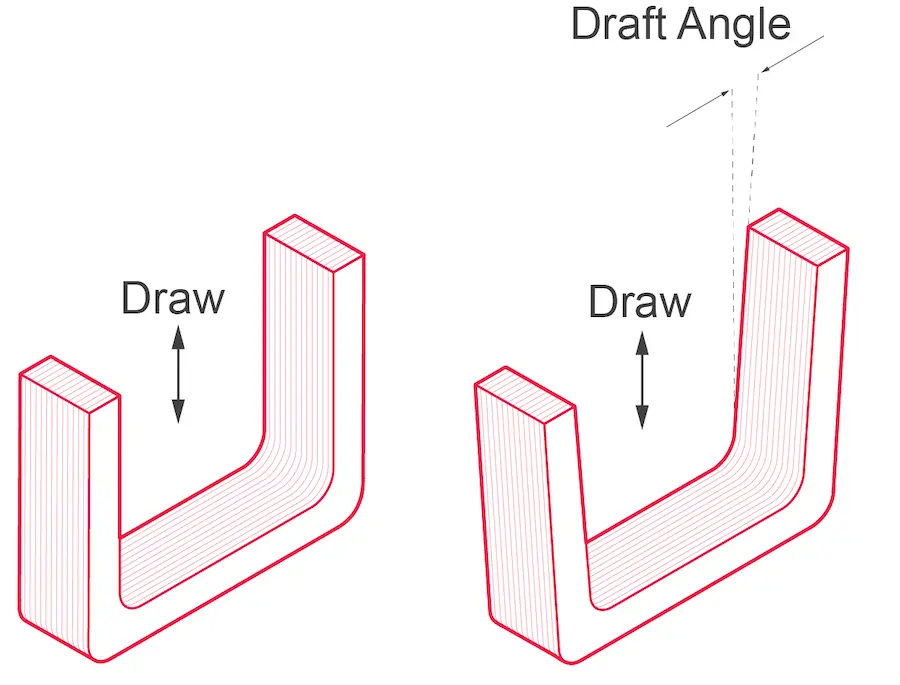
Draft Angles
Designers and engineers need to remember to add draft angles to a part's face to help the parts eject from the mould. The absence of draft angles can prevent parts from ejecting from the mould, which damages both the mould and part and is costly and time-consuming. It is suggested to give as much draft angle as is practically possible.
- Advised draft angle: 1 degree per 25mm cavity depth
- Minimum advised draft angle: 0.25 degrees
- Textured surfaces will require a minimum of 3 degrees of draft
When adding draft angles, consider the mould's parting plane. This will determine which surfaces require a draft and which do not. Faces that are perpendicular to the parting plane will require draft angles.
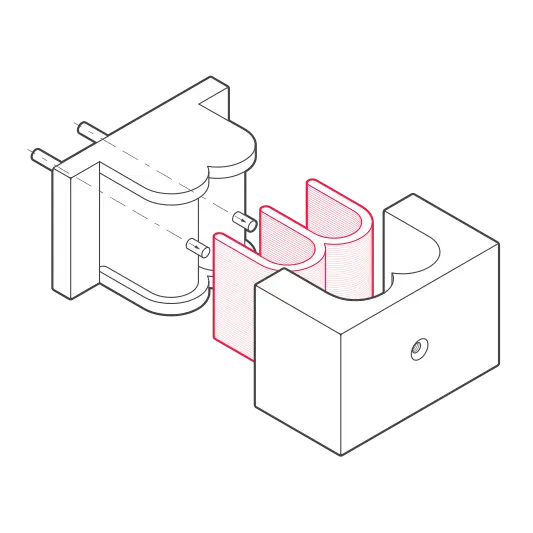
Undercuts
Try to avoid undercuts and overhangs in your design. However, if these are required, try to add additional design features such as slots to reduce the tooling complexity and avoid the need for sliding cores. If it is not possible to redesign your part to eliminate undercuts, sliding cores can be added. Cores are inserts that can slide in and out of the mould to create features such as undercuts. These add complexity and cost to a mould and should be avoided.


Sharp Corners
Internal concentrations of stress can occur with sharp corners within the part. This, in turn, can lead to part failures. Therefore it is recommended to have an inside radius of 0.5x the material thickness and an outside radius of 1.5x the material thickness. However, a larger radius should be used if the design allows for it.
- Inside radii > 0.5x wall thickness
- Outside radii > 1.5x wall thickness
Furthermore, rounded corners provide a more streamlined path for the molten plastic to flow, which aids the filling of the mould.
.webp)
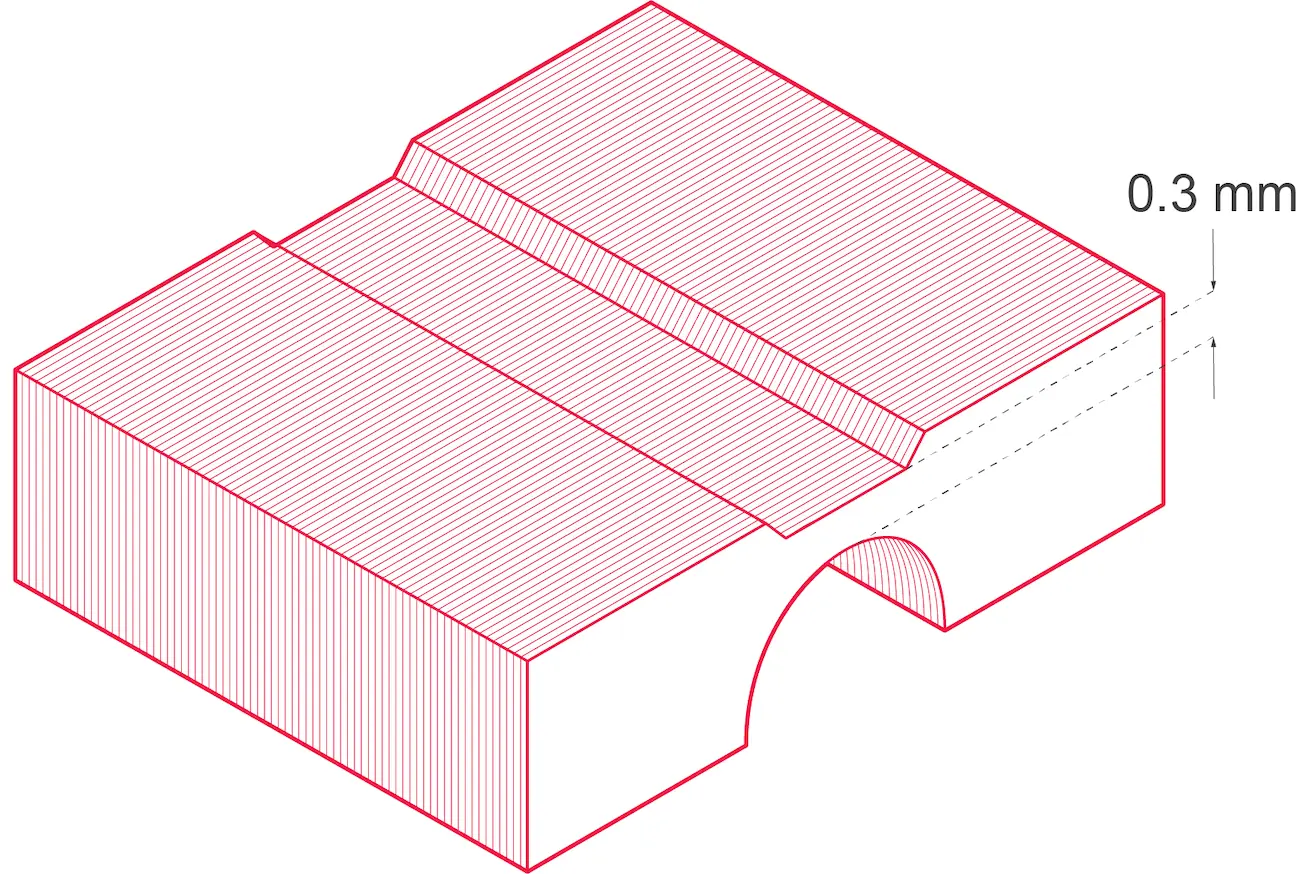
Living Hinges
Thin, flexible, hinge-like plastic sections that join two parts together are known as a living hinge. They are designed to flex/bend and are used in high volume plastic containers such as Tupperware. A flexible material needs to be used, and typically the wall thickness of a living hinge should be approximately 0.3mm.
Threads
Adding threads to injection moulded parts can be tricky as it often makes removing the part from the mould more difficult. External moulded threads can be created by having half of the thread in the core and the other half in the cavity. A threaded core can be inserted before moulding to create an internal thread. Then once the part is moulded, the core is removed to create the thread. Threads can also be created post moulding using a CNC machine. This can be useful as the same part can be threaded to different thread specifications.
.webp)
The other option is to add a metal thread into the part. Insert moulding can be used to add metal threads into your part during the moulding process, creating a strong, durable thread. Metal inserts can also be added post moulding using heat staking and ultrasonic welding.
Adding Text
It is common to find text and logos on injection moulded parts, and they can be added in two ways, embossed or engraved. Embossed text is often clearer to read, but the engraved text is harder wearing if subjected to abrasion. Whether you choose embossed or engraved also affects how the mould is manufactured. Embossed text is more common as the lettering is engraved into the mould, making it easier to machine, easier to polish and has a longer tool life. Three things to keep in mind when adding text:
- Avoid thin text with sharp corners and choose a bold rounded style font
- Use the minimum height/depth of text possible
- Make sure your text has draft added
.webp)
Injection Moulding Materials Selection
In short, a wide variety of plastic materials can be injection moulded, including thermoplastics, thermosets and materials with additives, for example, glass fibre. In this section, we will list some of the most commonly used plastics for injection moulding, and then we will outline the available surface finishing options.
When selecting a material, it is essential to consider the mechanical properties, surface finishing, manufacturability characteristics and cost. Here at Get It Made, our material options include but are not limited to the following plastics:
If you require a plastic not listed above, please get in touch, and we'll be sure to help you find a solution.
Injection Moulding Surface Finishes
The Society of the Plastics Industry outlines the SPI plastic surface finish types, an authority on surface finishing. This independent body categorises surface finishes into four separate grades based on surface roughness, ranging from a glossy to a textured finish. Each of these finish options is assigned a grade A, B, C and D. Within each of these grades, there are three further grades determined by surface roughness. These grades make it easy to define the exact surface finish you require, however, not all surface finishes can be applied to your chosen material.
To learn more about injection moulding surface finishes, the criteria dictating them, and the most-suitable plastics to employ, see our dedicated resource for injection moulding surface finishes.
Common Defects with Injection Moulding and How to Avoid Them
There are seven common defects with injection moulding. These are:
- Sink Marks
- Short Shots
- Warping
- Surface De-lamination
- Flow Lines
- Jetting
- Burn Marks
By following the correct design guidelines, the risk of these defects occurring can be minimised. Furthermore, at Get It Made, we provide free Design for Manufacture advice with your quote. This results in many of these common defects being avoided entirely.


Our article detailing the 7 Common Defects with Injection Moulding and How to Avoid Them can also act as a very useful tool in broadening your understanding of injection moulding.
Cost Reduction Tips for Injection Moulding
This section will outline some of the adjustments that can be made to help reduce the overall cost of your mould and parts. Three main areas will significantly affect the costs:
- Design - Complex designs result in complex and expensive moulds.
- Material - The cost of the bulk material and how easily it can be machined/extruded.
- Quantity - Cost per unit reduces with an increase in quantity due to fixed setup costs.
Our detailed resource on ways to reduce injection moulding costs can help you to reduce your injection moulding costs.
Design
Remove Undercuts
To create an undercut, complex tooling with sliding cores is required, which increases the initial tooling costs significantly. The design guidelines outlined previously within this guide help to demonstrate the ways in which slots can be added underneath overhanging features to eliminate the need for sliding cores.
Remove Unnecessary Features/Textures
Additional features such as text, company logos and textures will increase overall costs, so avoid them if possible. However, if they are required, it is best to mould them to prevent additional manufacturing processes. In this case, choosing a simple, easy to machine font can help keep costs down. The same applies to adding texture to a part; if required, it is best to mould the texture instead of having an additional finishing step.
Multi cavity Moulds (High volume)
If you require multiple parts of a similar size and the same material, they can be moulded together using a multi-cavity mould. Depending on the size of your part, a tool can contain two up to eight mould cavities. Although the initial tooling costs can appear very high, moulding multiple parts in one go can reduce costs significantly over time.
Optimising Your Design
Part design and, therefore, mould design is vital to the overall cost of a project. Every injection moulding tool is custom made, so there are many opportunities to reduce the cost and initial lead time when developing the mould. When optimising a mould to ensure all-around efficiency, there are many nuances, which takes years of experience. This is why it is always recommended to contact a knowledgeable injection moulding company early on in the design process.
Material
The material used in injection moulding can vary the part cost considerably, so it is crucial to select the suitable material depending on its thickness, weight and quality requirements. If you are looking for a low-cost material, consider using ABS (acrylonitrile butadiene styrene), PP (polypropylene) or HIPS (high impact polystyrene). If your part does not require virgin material, recycled material can be a great option for saving money and the environment because it minimises waste material.
Depending on the production volume, the mould can be manufactured from different materials to help reduce costs. For lower volume production, using aluminium moulds makes sense as aluminium is easier to machine, and so it will be subjected to less wear and tear. However, the mould needs to be manufactured from a harder wearing material such as steel for higher volume production, or to manufacture parts with narrow dimensional tolerances. It is essential to know the expected production volume to manufacture the most cost-efficient mould.
%20(1).png)
Quantity
Injection moulding is best suited for medium to high volume production. By manufacturing large volumes of parts simultaneously, the fixed costs can be shared across more parts, making each individual part more economical. For high volume production, it can be beneficial to create multi-cavity moulds to increase production efficiency. If you go from a one-cavity mould to a four-cavity, you roughly quadruple your production speed while also reducing the wear and tear on your mould.
Injection moulding is an excellent option for medium-high volume production; however, if you are looking at lower volumes, CNC machining and 3D printing becomes a more cost-effective means of production. See the graph for a visual representation of economies of scale.
How much does plastic injection moulding cost?
Injection moulding costs vary considerably based on the required size, complexity, and quantity of parts. Injection moulding costs can also be divided into two main categories: tooling costs and unit costs. Expect to pay a few thousand pounds at minimum for injection moulding tooling. However, the price can rapidly increase when incorporating sliding cores and multi-cavity moulds. The tooling costs include designing the mould tool itself, which can be a time-consuming process, and manufacturing the metal mould. The great thing about injection moulding is its speed and efficiency, meaning unit costs can be as little as a few pennies! See how much your injection moulding project will cost by following the steps below.

Obsessed with making sure we offer the best service possible in the manufacturing industry. Father to one, and hopefully many more!


Need custom metal and plastic parts?
Get 10% off your first order
No newsletter, no marketing, just a discount code for custom parts.


