Surface Roughness Explained
In this guide, Get It Made shares everything you need to know about surface roughness in manufacturing.
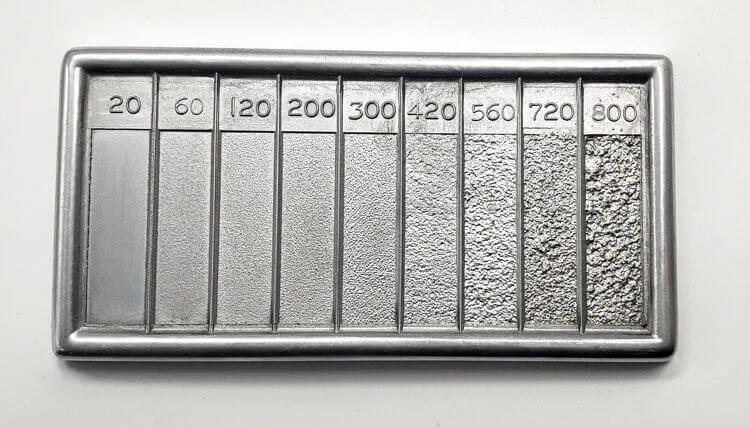
This resource will share ways to measure and compare surface roughness in CNC machined parts, extrusions, moulding, casting and 3D printing, as well as standard surface finishes to expect. If you are unsure of the standard surface finishes for precision machined parts, or how to measure surface roughness, read on.
What is surface roughness in machining and manufacturing?
Surface roughness is the measurement of the relative smoothness of a surface’s profile, calculated via the microscopic deviations in a surface's true form. The larger the deviation from its true form, the rougher the surface, whilst the smaller the deviation, the smoother the surface.
{{cta-banner}}
Surface roughness in CNC machined parts
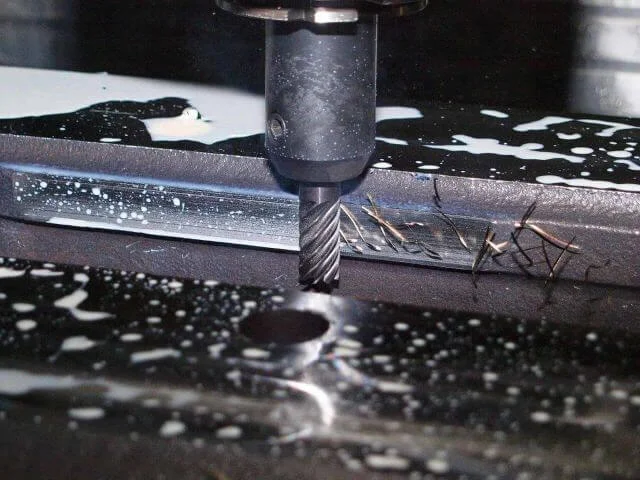
In CNC machining, the surface roughness will influence how the manufactured part will interact with the surrounding environment. A typical CNC machining finish, ‘as machined’, is smooth to the touch (Ra3.2) but will contain visible machining lines from the cutting tool. This level of roughness is suitable for most parts; however, in some instances, a smoother surface is required. A smoother finish can be desirable when designing sliding parts as it will reduce the friction between parts and increase wear performance.
An additional slower machining step or a post-process finishing step such as polishing to achieve a smooth surface. Manufacturing costs increase as roughness reduces, so there can be a trade-off between surface roughness and cost for some parts.
Sometimes it can also be desirable to have a rougher surface finish on a part. For example, a seat post on a bicycle needs to have a high friction coefficient not to slip down when used. A rougher finish cannot be achieved through machining.
A secondary process like bead-blasting or tumbling is required. There is no one way to achieve a particular surface roughness as both the machining process and secondary finishing influence the surface roughness. Get in touch with a member of our team to discuss the optimal procedure for finishing your parts.
Units of measurement for surface roughness
A common unit of measurement of surface roughness is by measuring the “average roughness”, which is often communicated as “Ra”. Ra is the calculated average between peaks and valleys on a surface.
The lower the Ra value, the less variation between the peaks and troughs on a surface, making the surface smoother. For example, a lego block will have a low Ra value, as will a laptop's touchpad.
With a higher Ra value, these products would be highly textured and coarser and therefore potentially unsuitable for their desired use. This contrast of Ra values illustrates the importance of determining the desired surface roughness of a product before the manufacturing process begins. Without such determinations, machining finishes of a product may vary significantly from what was initially intended.
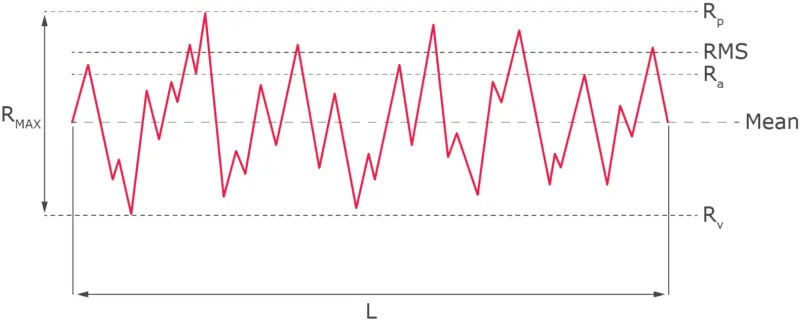
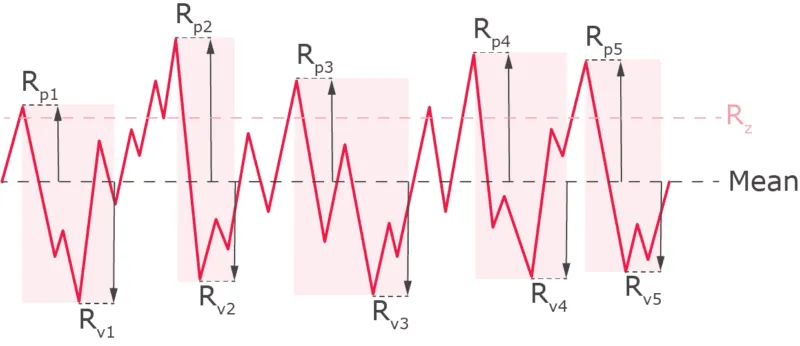
The illustrations below demonstrate the variations between the values of Ra (the numerical average of all the peaks and valleys across the length of the test) and Rz (the average of consecutive highest peaks and lowest valleys).
Surface roughness terminology
Ra - The numerical average of all the peaks and valleys across the length of the test. It’s also called the Center Line Average (CLA).
Rz - The average of consecutive highest peaks and lowest valleys. Vertical distance between the highest peak and lowest valley, the distance of the second highest peak and the second-lowest valley, etc. This is usually done for the five biggest deviations, and then an average is calculated.
Rp - The calculated distance between the profile’s tallest peak and the mean line within the evaluation length.
Rv - The calculated distance between the profile’s lowest valley and the mean line within the evaluation length.
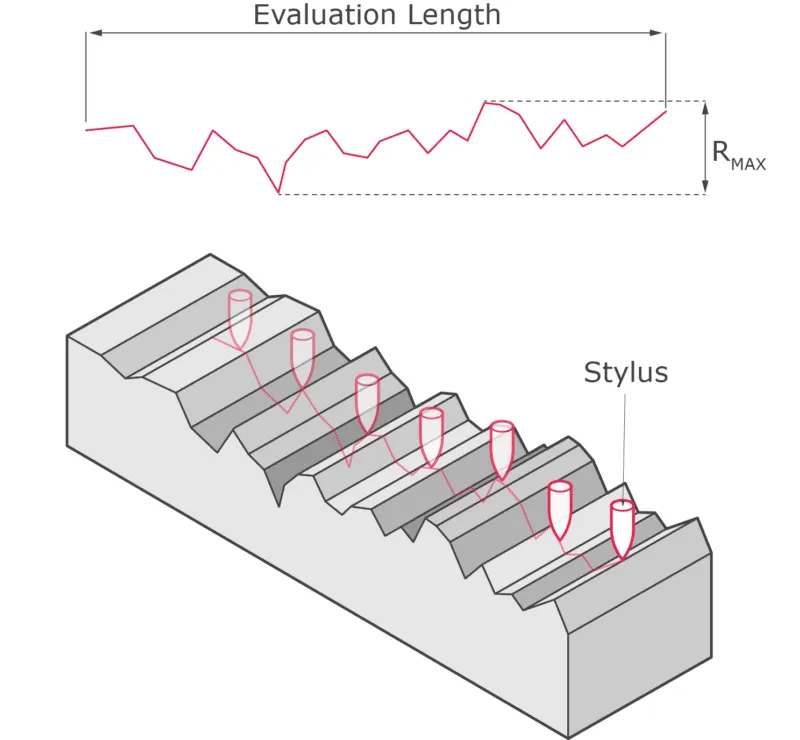
Rmax - The biggest successive deviation between the highest peak and the lowest valley, calculated within the evaluation length.
RMS - Calculated within the evaluation length, this is the root mean square average of profile height variation from the mean line.
What is a good surface roughness or surface finish standard in manufacturing?
Good surface roughness is determined according to the needs of parts, components, or the requirements of your project. For example, different types of surface finish can be applied to a part after it has been manufactured. These surface finish types can improve the wear resistance and the aesthetic or visual appearance of a part. However, these finishes may not be as precise as the machining tool, and they can affect the dimensions, conductivity, or compatibility with certain alloys.
Achievable surface roughness averages through CNC machining include:
- 3.2 μm Ra
- 1.6 μm Ra
- 0.8 μm Ra
- 0.4 μm Ra
What are Ra Units?
Ra, or Roughness Average, is a parameter of surface roughness and is typically measured in micrometres (µm) or micro-inches (µ-in). It's worth noting that the terms "micron" and "micrometre" are interchangeable and widely used in the industry. To give a perspective, one micrometre is approximately equal to 40 micro-inches.
Ra Value in Surface Roughness
The Ra value, or Roughness Average, is a critical parameter in surface roughness measurement. It is calculated as the arithmetic mean of the absolute values of the surface height deviations from the mean line, within a specified evaluation length. Essentially, the Ra value represents the average of all individual measurements of a surface's peaks and valleys.
The formula for Ra is as follows:Ra = 1/L ∫|y(x)| dx from 0 to L
Where:
L is the sampling length
y(x) is the vertical deviation from the mean line at a distance x along the surface
This formula provides a more comprehensive understanding of the Ra value and its significance in surface roughness evaluation.
What is the standard surface finish in machining?
The standard surface finish for a machined part is usually 3.2 μm Ra. This is the least expensive, and typically the roughest machining surface finish recommended for parts intended to experience vibrations, heavy loads, or amounts of stress. Although this finish will leave visible cut marks, it will save in costs and time spent manufacturing as they are machined using high speeds.
The surface roughness can be smoothed down to a lower Ra with the inclusion of a finishing cutting pass. However, this can increase the price, add extra machining steps, and create a longer production time.
Get It Made’s precision machining has surface finishing standards of 3.2μm Ra and 1.6 μm Ra for as-machined parts.
Types of Machining Finishes
Machining finishes refer to the final surface texture and appearance of a part after it has undergone a machining process. The finish can vary based on the machining method used, the material, and the desired end result. Here are some common types of machining finishes:
- As-Machined Finish - This is the surface finish that results directly from the machining process without any post-processing. It may have visible tool marks and is not typically very smooth.
- Smooth Finish - Achieved through processes like grinding or honing, this finish has a very fine surface texture. It's ideal for parts that require a smooth surface for functional or aesthetic reasons.
- Textured Finish - Some parts may require a textured surface for grip, aesthetics, or other functional reasons. This can be achieved through processes like knurling or bead blasting.
- Mirror Finish - This is a highly polished finish that reflects light, similar to a mirror. It's achieved through extensive polishing and is often used for decorative parts.
- Anodised Finish - For metals like aluminium, an anodising process can be used to create a protective oxide layer on the surface. This not only provides protection but can also add colour to the part.
It's essential to choose the right machining finish based on the part's intended use, material, and design specifications. The surface roughness, represented by the Ra value, can give an indication of the finish's smoothness. However, it's always best to consult with a machining expert to determine the most suitable finish for a specific application.
How to choose the suitable surface roughness for your project
When selecting the suitable surface roughness for your project, there are several factors to consider. The Ra may need to be higher or lower depending on the product’s application, the required durability, if the part will be polished or painted, the importance of precise dimensions, and the project's budget.
3.2 μm Ra is perfect for a low-budget project that may receive other forms of finishing later, such as painting or polishing. 1.6 μm Ra will show even fewer cut marks and can also be an economical choice.
Smoother surface requirements, such as 0.8 μm Ra or 0.4 μm Ra, will be more costly but necessary for projects that require control and perfect dimensions. This high-grade finish will have no visible cut mark, ideal for parts exposed to concentrated stress.
The finest roughness averages are more pricey due to the extra manufacturing effort required. They should only be specified if smoothness and perfect dimensions are essential to the project.
{{cta-specialist}}
How are different levels of surface roughness achieved?
Surface roughness is resolved ahead of time by the designer and manufacturer. It’s a vital detail that must maintain consistency to produce reliable products that correctly interact with their environment.
Different types of surface finish can determine how durable a part will be. If a part is rougher than it needs to be, there can be irregularities in the surface that will cause quicker wear and tear, breaks, and corrosion. Some surface roughness may be desired as well to help with the adhesion of coatings and paints or to improve conductivity.
Ra values most commonly measure different surface roughness levels. A surface roughness chart can show different types of surface finish with Ra roughness values ranging from 12.5 μm Ra (very rough) to 0.4 μm Ra (very smooth).
As-machined
Leaving a product with an as-machined finish will ensure the tightest dimensional tolerances, up to ± 0.05 mm or better. CAM, or Computer-Aided Manufacturing, allows for exact data paths and tool paths that will be faithful to the original design. There is typically no added cost for the standard finishes.
However, there will be visible tool marks, and the parts may appear dull. An as-machined product can be the most cost-effective solution available without additional surface finishing types, especially for prototypes, fixtures, and jigs.
Bead blasted
A bead-blasted finish is achieved by the use of a pressurised air gun. Small glass beads are blasted onto the surface, leaving a matte or satin finish and a faint surface texture. This uniform finish can hide tool marks created on a machined part and is mainly utilised for the polished final look.
Bead blasting is not ideal for projects that require exact dimensions as the process is not highly controlled. While critical features, like holes, can be masked and hidden during the process to avoid much change, the rest of the part will be affected in dimension and surface roughness.
The only controllable aspect of this finishing type is the size of the glass beads.
Anodising
Anodising is a process that adds a thin but highly protective oxidised layer to metal parts. It is done through electrochemical reactions when a part is submerged in an acidic solution and exposed to an electric voltage. The coating will grow equally in all directions, which means this finishing type has better dimensional control than bead blasting.
The resulting coating is electrically non-conductive with high hardness qualities. However, this process is only compatible with Aluminium and Titanium alloys.
Anodised type II
Anodising type II is known as the standard anodising process. It produces a coating that can be clear or coloured with a thickness of up to 25 μm. This type of surface finish is ideal for parts that require a smooth, wear-resistant, and visually appealing exterior.
Anodised type III
Anodising Type III does generally cost more than Type II. The extra cost is due to the closer control required during the process. A higher current density is needed, and a constant solution temperature of zero degrees Celsius must be kept for the electrochemical reaction to produce a much thicker coating of up to 125 μm.
Anodising type III is also known as “hard coat” anodising. Components with this finish will have a harder outer layer, providing superior corrosion resistance perfect for top engineering applications.
How is surface roughness measured?
There are both manual and digital methods in which surface roughness can be measured, though the surface roughness tester that is most commonly employed is a profilometer. One of the most accurate ways to measure the surface roughness of an area, a profilometer can utilise a variety of profiling techniques ranging from contact to non-contact methods.
How to measure surface roughness
This section will take you through some of the options for measuring the surface roughness of manufactured and machined parts. Read on to learn more about the available methods to help decipher which is most suited to your project and needs.
Contact profilometer
A contact profilometer works by measuring the displacement of a diamond stylus as it is moved across the surface of a manufactured component. Often measuring up to 25mm as the stylus is displaced along a product’s surface. This displacement is then converted into digital values displayed on the profilometer screen. Once displayed, measurements are subsequently analysed by product designers and/or manufacturers, and a greater understanding of the product’s attributes can be obtained.
Should I use a contact profilometer?
However, despite its accuracy in determining surface roughness, some limitations are associated with contact profilometer techniques. First of all, when in contact with the surface during the measurement process, the stylus can potentially cause damage to a product surface, causing rough surfaces and variation that was not there previously. In addition to this, it is also slower than non-contact techniques and, as such, can potentially slow down the process of assembly if employed within mass-production processes.
Non-contact profilometer
A non-contact profilometer can be employed via several techniques, including laser triangulation, confocal microscopy, and digital holography. However, the most common application of a non-contact profilometer comes in the form of optical profilometry, which uses light rather than a physical probe, such as a stylus.
In this technique, light is directed onto the surface of the product. Via the reflections gained from a well-positioned reference mirror, a camera can detect the surface in 3D. As a result, a three-dimensional profile of the surface can be obtained, and variations from the ideal surface profile are detected.
Should I use a non-contact profilometer?
Non-contact profilometers are very reliable and able to measure surface variation to within micrometres. Non-contact methods such as this also represent a cheaper option than their contact counterparts and enable a faster method of calculating surface roughness. A non-contact surface measurement tool can measure a larger area as it is not dictated by the size of a stylus tip.
Portable surface roughness tester
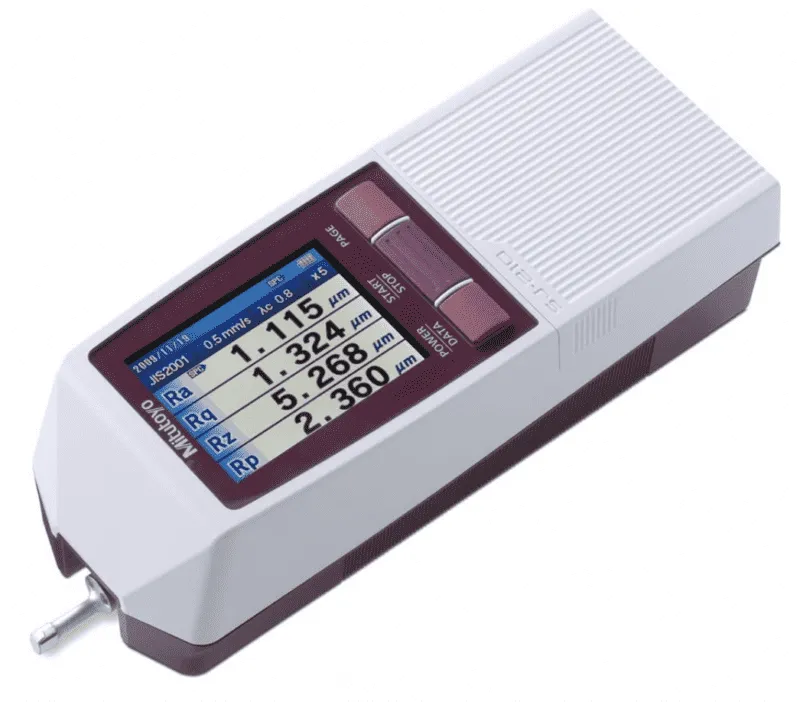
Although still digital, a portable surface roughness tester can take surface measurements without being connected to a mains power outlet. With a back-lit screen to show its findings, this device is able to display sectional calculation results and amplitude distribution curves, as well as its original surface roughness calculations. Similar to a contact profilometer, this device also uses a stylus to undertake its measurements.
Surface roughness comparator
A surface roughness comparator is used to manually assess a manufactured product's surface roughness/finish. Selected in accordance with the manufacturing process used and desired finish, comparators display industry-standard finish grades, against which a product’s surface can be compared.
Should I use a surface roughness comparator?
Although a surface roughness comparator represents a cost-effective and easily accessible means of assessing surface roughness, it also possesses an obvious weakness. Due to the fact that deviations in a product’s surface are calculated using judgements passed by either touch or aesthetic appearance, the level of accuracy achieved via this method is lower than those undertaken by the use of a profilometer.
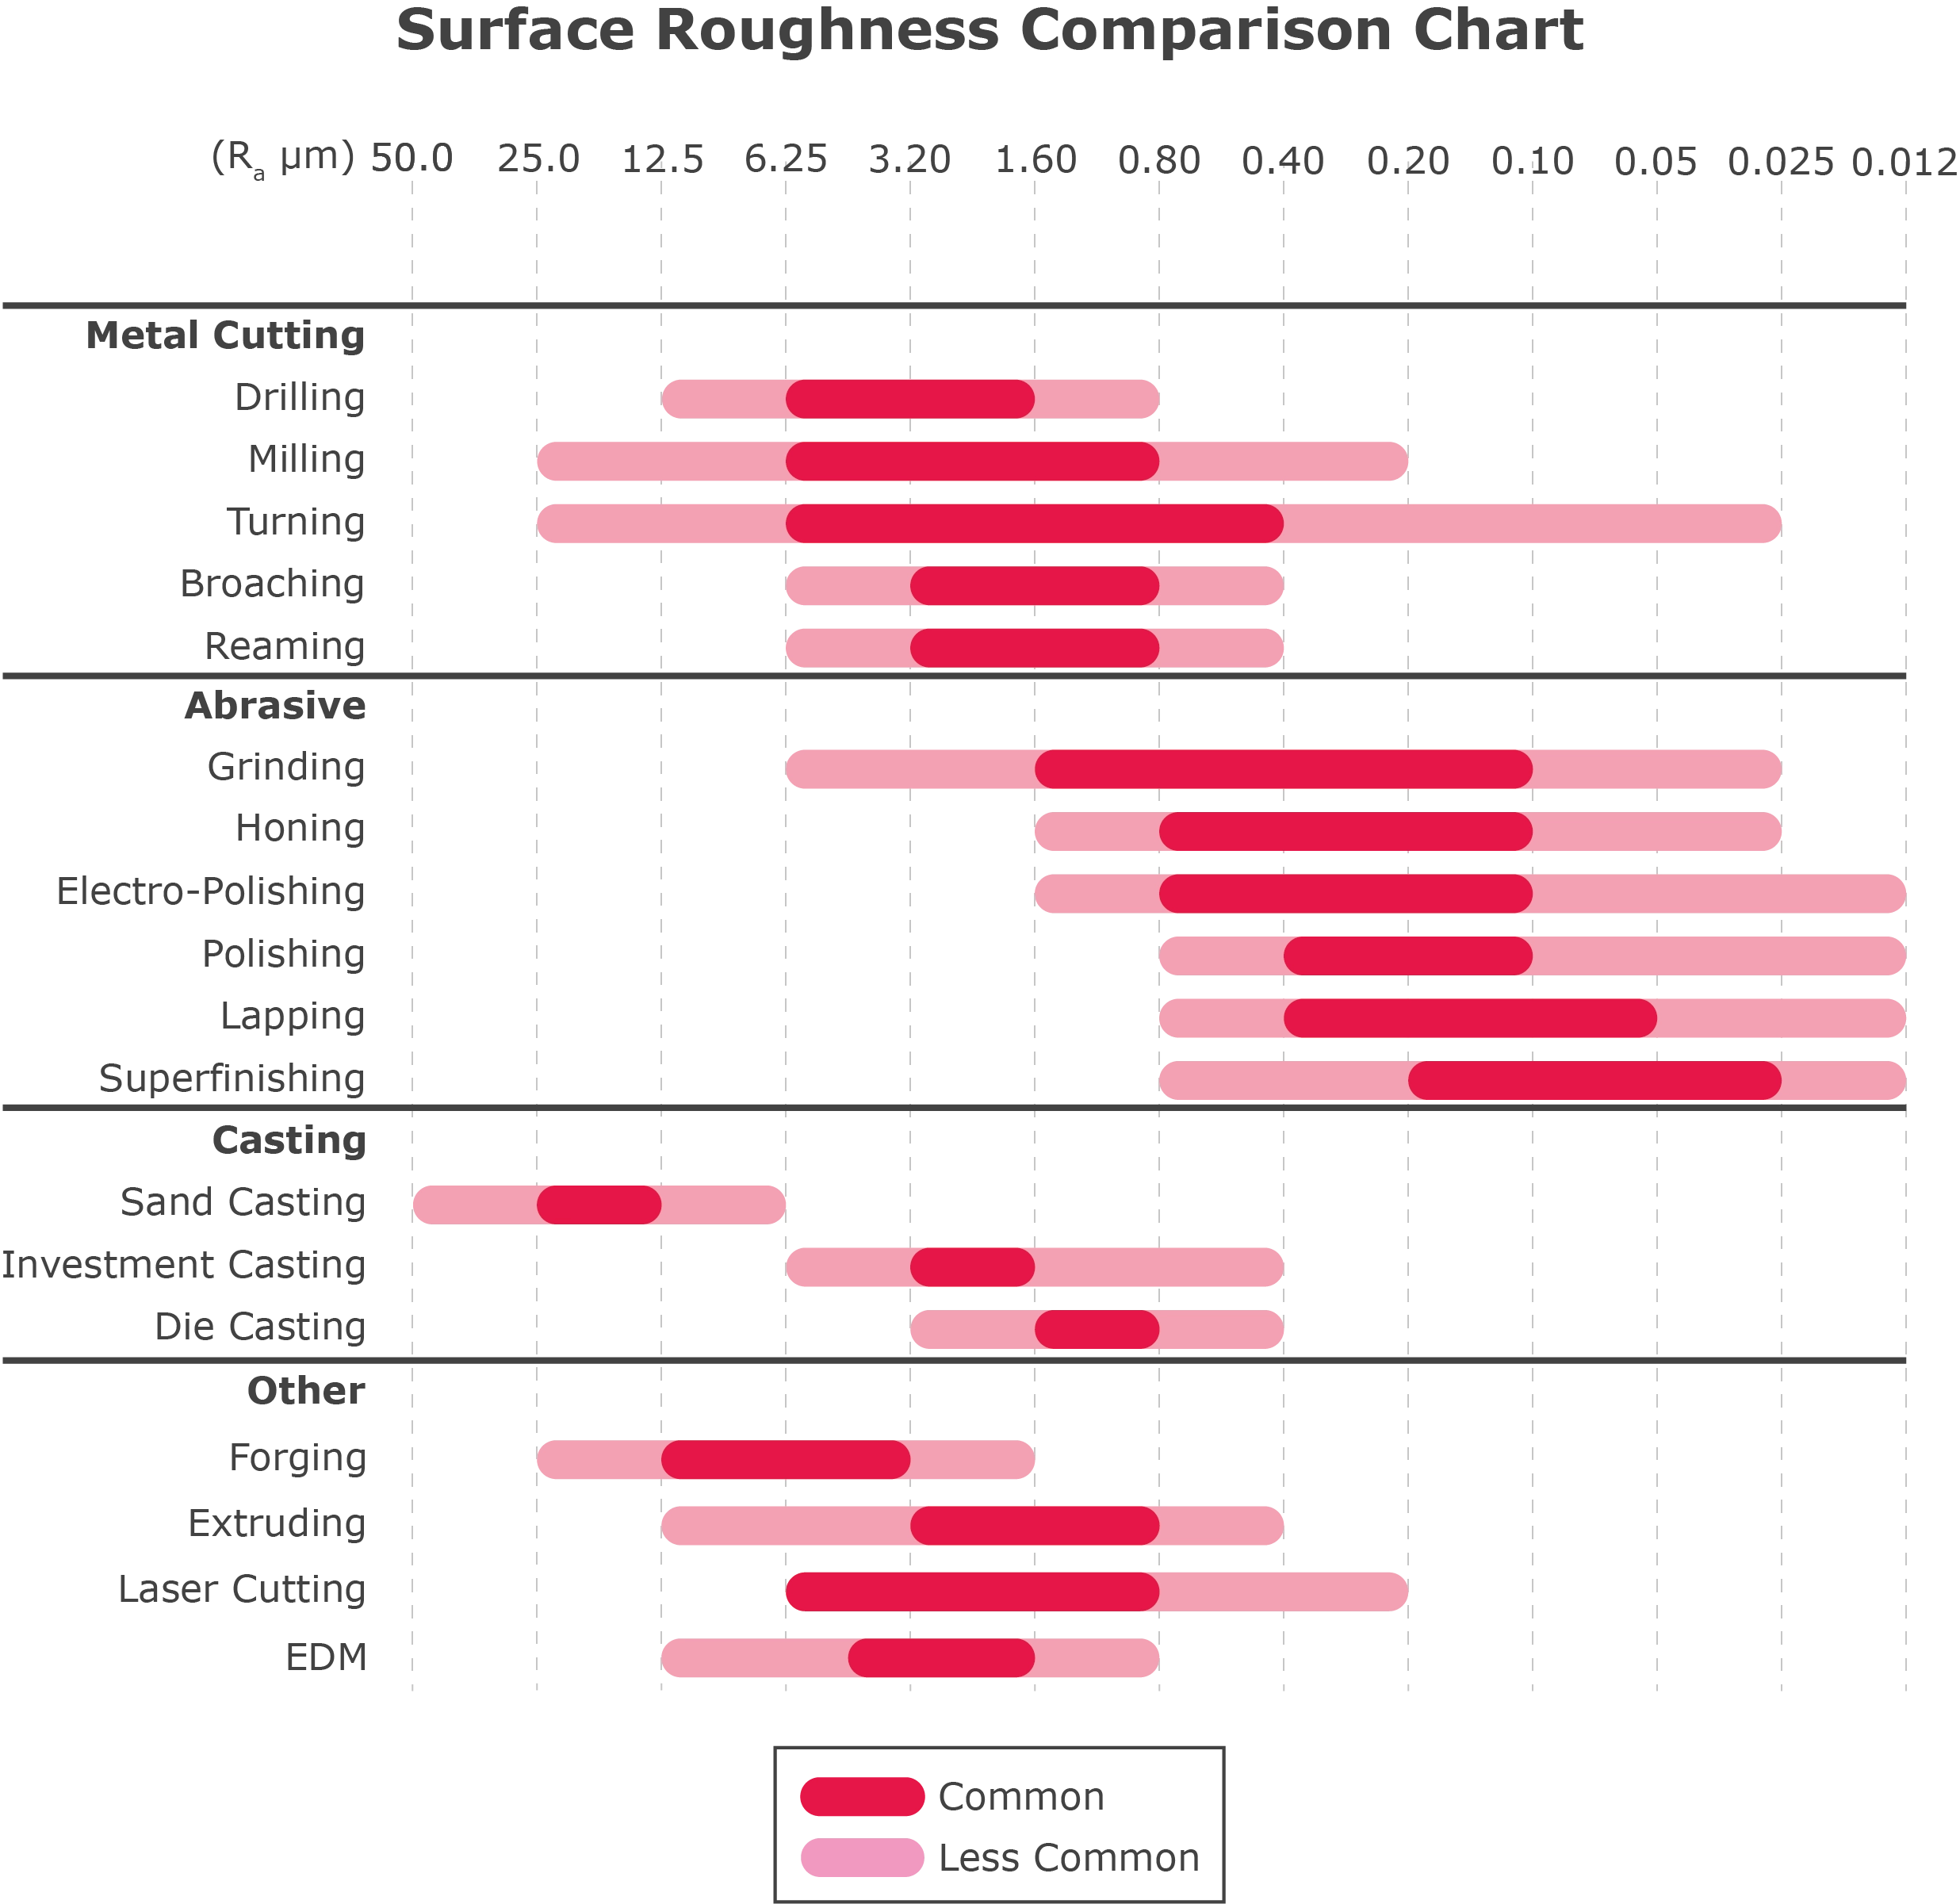
Manufacturing surface roughness comparison chart
A surface roughness comparison chart is an important guideline for engineers, enabling them to compare common surface roughness values for different manufacturing processes. Being able to understand a chart such as this and the conversion between contrasting units of measurement is a useful addition to any engineer’s arsenal.
Cost of surface roughness
There are a number of factors that impact the cost of surface roughness finishes.
Not only do different surface roughness values have different physical properties, but they can also have vastly different costs associated with them. Due to the greater process required, a manufactured product with a low Ra value will be more expensive than a manufactured product with a high Ra value. For example, to achieve low Ra, smooth surfaces, potential additional processes such as surface grinding may be required, as well as the time-consuming task of manually polishing each piece. The latter of these possibilities requires abrasive compounds, such as tape or sandpaper, and is very arduous and slow compared to machining processes used to achieve lower Ra finishes.
As such, as well as Ra values presenting cost-efficient decisions to be made, it also impacts decisions over factors such as manufacturing time-frames due to the length of time taken for a manual process such as polishing.
To speak to us regarding what might be best for your project and arrange a quote, get in touch with Get It Made today.
Surface roughness symbols and abbreviations
The surface roughness chart below denotes the various surface roughness symbols and abbreviations commonly used within engineering practices and the meaning behind them. Understanding these symbols is crucial in achieving the desired finish of your manufactured part.
When used, they will dictate the final finish of each manufactured surface. Being able to both use and understand engineering drawings dictated by symbols such as this is critical in the eventual success of any part manufactured. Get It Made's technical toolbox also contains a comprehensive guide to surface finish symbols.
The marks made by the cutting tool during machining when forming a radial pattern in relation to the centre of the surface on which the symbol is shown. Here are the symbols and their meanings:
- = : The marks made by a cutting tool during machining when parallel with the surface or view on the drawing.
- ⊥ : The marks made by the cutting tool during machining that are perpendicular to the surface or view on the drawing.
- X : The marks made by the cutting tool during machining when at an angle and cross each other, in a criss-cross pattern.
- M : The marks made commonly by polishing or lapping that cross multiple times or have no set direction.
- C : The marks made by the cutting tool when forming mostly concentric circles in relation to the centre of the surface.
- R : The marks made by a cutting tool during machining when parallel with the surface.
Surface Roughness Conversion Table
The table below is a conversion between industry-standard units used within the surface roughness measuring process. Understanding the conversion between alternative industry-standard units, such as surface roughness Ra in metric and imperial, and ISO can be useful when finalising considerations for your desired surface finish.
Ra - Surface roughness, measured in both micro-meters and micro-inches
Rt - Roughness, total in microns
N - ISO 1302 Roughness grade numbers.
Surface Finish Measurements
Surface finish measurements are essential metrics used to quantify the texture and topography of a manufactured surface. These measurements provide insights into the quality, functionality, and aesthetic appeal of a product. The process involves assessing the deviations and irregularities on a surface, which can be caused by various manufacturing processes such as machining, grinding, casting, and more.
To perform surface finish measurements:
- Select the Appropriate Instrument - Depending on the type of surface and the level of precision required, choose a suitable instrument. Common tools include profilometers, interferometers, and atomic force microscopes.
- Prepare the Surface - Ensure the surface is clean and free from contaminants. Any debris or dirt can affect the accuracy of the measurements.
- Calibrate the Instrument - Before taking measurements, calibrate the instrument according to the manufacturer's guidelines.
- Measure the Surface - Glide the instrument's probe or sensor across the surface to capture a profile. This profile represents the peaks and valleys of the surface texture.
- Analyze the Data - Using specialized software, analyze the captured data to determine key parameters such as Ra (average roughness), Rz (maximum height), and more.
By understanding and controlling surface finish measurements, manufacturers can ensure that their products meet desired specifications and performance criteria.
More information regarding injection moulding surface finishes, and the industry-standard grades in which they must abide to, can be found via resources published by Get It Made.
Get It Made can produce bespoke and high precision CNC Machined parts, from low volume prototyping to high volume manufacturing. We can produce these parts from plastic and metal materials, including Aluminium, Stainless Steel, POM, ABS, PP and more.
We partner with top-quality factories to produce tolerances of ± 0.05 mm or better, with one to two and a half weeks lead time for complex projects, quality assurance reports and certificates, and more.
Please contact us to discuss the best materials and surface roughness for your project today or request a 24-hour quote!
Leave it to our manufacturing specialists
Get a 24 hour, engineer made quote and design review to start your manufacturing project off on the right foot
Get your production-ready quote in 24 hours
All projects are reviewed by real engineers to ensure accuracy, catch mistakes and unlock DFM improvements
Our services
From 3D printing to CNC machining, we’re experts in manufacturing bespoke precision parts on tight time-frames
Other services
It’s rare you only need CNC machining services. We offer 3D printing, moulding, casting, extrusion, fabrication, assembly, welding & more.
Get your production-ready quote in 24 hours
All projects are reviewed by real engineers to ensure accuracy, catch mistakes and unlock DFM improvements
Bespoke quote in 24 hours
Get It Made is proud to provide a human service. Get a quote and free design review by an experienced engineer to see how we make manufacturing simple.


