

This complete engineering guide will teach you everything you need to know about 3D Printing This guide will cover:
The Basics
What is 3D Printing?
3D printing is an ‘additive’ process that builds a three-dimensional part layer-by-layer from a CAD file. Due to the nature of the process, the term '3D Printing' is often used interchangeably with 'Additive Manufacturing'. The process can be thought of as similar to a traditional inkjet printer; instead of printing one layer, the machine prints multiple layers of the design's cross-section again and again until the 3D part is formed.
This manufacturing method is the opposite of more conventional subtractive manufacturing methods such as CNC machining. You start with a block of material and ‘subtract’ material away to form your design part.
{{cta-banner}}
How Does 3D Printing work?
All 3D printing projects begin in the same way, with a 3D CAD file. This can be designed yourself using a CAD package or downloaded from one of many online repositories. As 3D printing manufactures parts in a layer-by-layer fashion, the CAD file needs to be ‘sliced’ up into layers to create the printers build path. 3D slicing software is used to configure the digital design and translate this into a code/language that can be understood by the 3D printing machine called GCODE. The printer then has the instructions for the build path it should take and the final 3D part is manufactured additively layer by layer.
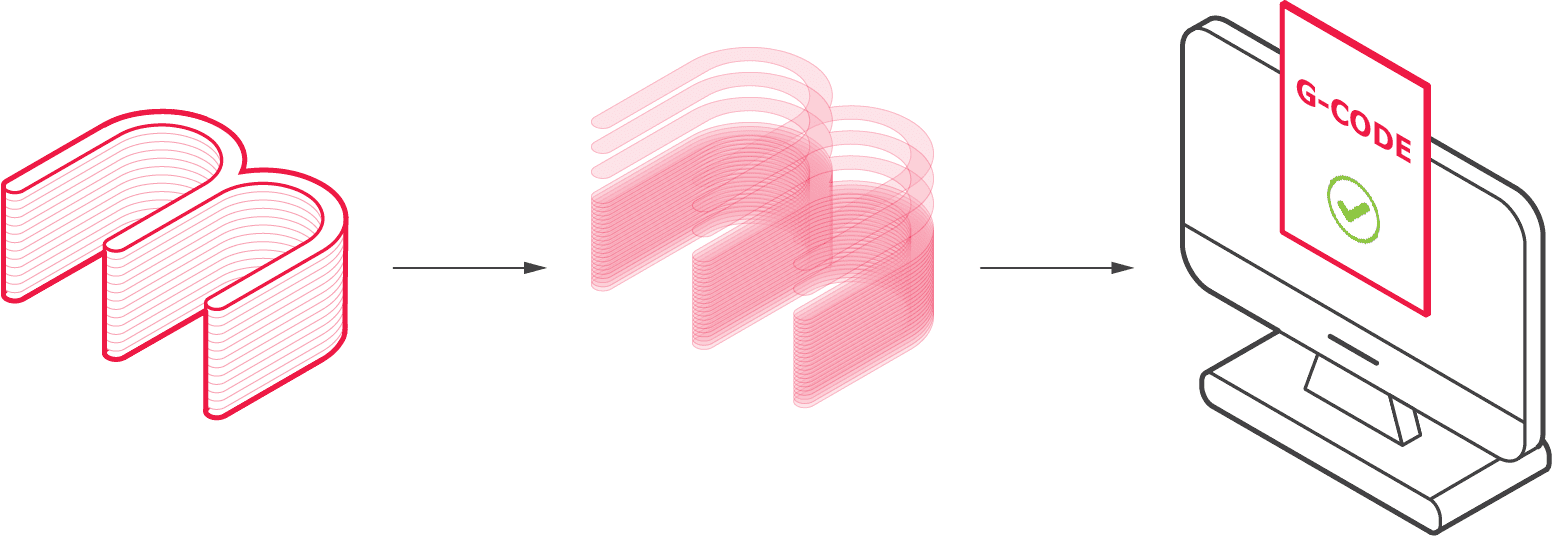
Whilst there are several different types of 3D printing processes, the general process can be broken down into three simple steps:
- A 3D CAD file is created or downloaded.
- The 3D model is sliced into 2D layers and converted into GCODE, which tells the 3D printing machine's its build path.
- The part is then built up in layers through either a filament, liquid or powder medium.
Depending on the size, complexity and number of parts required, 3D printing can take as little as an hour to up to a couple of days. Compared with conventional processes, especially casting, 3D printing lead times are superior.
Post-processing may also be required to achieve the desired level of surface finish. Typically this can involve a light bead blast or sanding to get a smoother surface.
What is 3D printing used for?
Initially, 3D printing was developed for rapid prototyping, as parts can be manufactured at a low cost with a quick turnaround time. This is valuable for refining a design before committing to a traditional manufacturing method such as injection moulding.
Prototyping is still one of the primary uses for 3D printing. However, the technology has continued to disrupt the manufacturing industry and has developed over time. Increasingly 3D printing is used for final part production and can be found in the most demanding environments. NASA’s Perseverance Rover that landed on Mars in 2021 contained titanium SLS parts. The design freedom that 3D printing offers allowed the engineering team to create the lightest parts possible.
Another recent industry to adopt 3D printing is the art and jewellery sector. The low startup costs and design flexibility allows designs to create unique pieces of art/jewellery without the cost and design restriction traditional manufacturing presents.
How much does 3D printing cost?
The initial investment for 3D printing is low as no tooling is required. This makes low volume production and one-off parts very economical. 3D printing costs vary depending on the bounding box size, type of material and the specific 3D printing process required.
Generally speaking, part complexity is less of a factor in cost compared with conventional methods such as CNC machining. This allows for complex parts to be produced with little additional cost. However, do remember that some 3D printing processes require support material for overhanging sections. Consequently, complex parts may need additional support material, which will add to the material costs. Check out our section on ways to reduce your 3D printed parts below.
The best way to determine the price of a 3D printing project is to arrange a quote with a reputable 3D printing service provider such as Get It Made.
What types of 3D printing are available?
There are several types of 3D printing processes available on the market. The main differences are the raw material inputs (filament, powder or liquid) and the method for binding the layers of material. We have highlighted the three most common 3D printing methods below.
FDM
Fused Deposition Modelling, or FDM, is one of the most ubiquitous 3D printing processes, especially amongst the consumer 3D printing market. This is due to the relatively low machine and material costs paired with the simplicity and ease of the FDM 3D printing process.
In an FDM 3D printer, a solid filament of thermoplastic is fed through a heated nozzle which causes the plastic to become molten. The nozzle is moved relative to the build platform, depositing the molten material, solidifying and gradually building the 3D part, layer at a time. Typical layer heights are 50 to 300 microns (0.05 to 0.3mm).
There are a wide variety of materials available for FDM 3D printing. However, the two most common are PLA and ABS. These are available in a wide range of colours. Some FDM printers are equipped with two (or more) nozzles, allowing for multi-material and multi-coloured 3D prints!
Whilst FDM 3D printing is economical, the relatively slow build rate and requirement for support material have resulted in the process being mainly used for simple, consumer parts. Furthermore, the layers that the part comprises are generally visible, which can be less desirable for parts requiring a cosmetic surface finish.

✅ Low machine and material costs
✅ Simple manufacturing process
✅ Broad range of material available
❌ Low dimension accuracy
❌ Requires support structures
❌ Strong anisotropic properties
SLA
Stereolithography or SLA is another popular 3D printing process that is widely used in industry. With SLA 3D parts are produced by selectively curing a photosensitive thermoset polymer resin using an ultraviolet laser. The UV laser is reflected off a rotational mirror which allows an SLA layer to be cured extremely quickly. Consequently, SLA 3D printing is one of the fastest 3D printing technologies. Typical layer heights are 25 to 100 microns (0.025 to 0.01mm).
Another key benefit of SLA is producing parts from clear resins to a very high surface finish. This makes SLA particularly well suited for parts that need to be optically transparent or require an aesthetic surface finish.
One disadvantage of SLA is the fact that SLA parts can be brittle. The mechanical properties can further degrade over time when exposed to UV light. Therefore, SLA 3D printing is not recommended for functional parts where mechanical properties are critical.
A similar 3D printing process called Direct Light Processing (DLP) uses projected light instead of a UV laser. For the most part, these two processes can be treated as equals, and they both fall under the broader category of Vat Polymerisation.

✅ Fast processing times
✅ High-quality surface finish
✅ Good dimensional accuracy
❌ Resins are expensive and limited
❌ Requires support structures
❌ Brittle when exposed to direct sunlight
SLS and DMLS
Selective Laser Sintering (SLS) and Direct Metal Laser Sintering (DMLS) are powder-based 3D printing processes. The processes have similar mechanisms and work by selectively sintering powder with a laser to fuse particles. The fused particles gradually build the part layer at a time. Typical layer heights are 100-200 microns (0.01 to 0.02mm).
The difference between SLS and DMLS is the material used in the process. SLS is used to refer to the process when thermoplastics are being used and DMLS when metal alloys are being used. SLS is commonly used as an umbrella term for both processes. Both produce parts with high mechanical strength and are widely regarded as one of the best 3D printing processes for creating functional prototypes. Both the machines and material (powder) are typically more expensive than FDM and SLA, resulting in more expensive parts.
Another essential benefit of SLS is that support material is not required. This is because layers of un-sintered powder can naturally support sintered material above it. For complex parts that would otherwise need a large amount of support material, SLS is an excellent manufacturing method.

✅ Suitable for functional testing parts
✅ Good dimensional accuracy
✅ No support structures needed
❌ Limited part size
❌ Grainy surface finish
❌ Mainly only industrial machines available
Additional additive manufacturing methods
Material Jetting
Material Jetting, sometimes known as Polyjet, is a 3D printing process that shares similarities with conventional 2D inkjet printers. A moving nozzle deposits droplets of a liquid photosensitive polymer onto a platform to form a layer. The layer is then exposed to UV light to cure/harden the material. Typical layer heights are 16 - 32 microns (0.016 to 0.032mm).
A significant advantage of material jetting is the ability to add colour to the deposited material. Therefore multi-colour parts are possible, opening up a wealth of creative opportunities.
Similarly to SLA, material jetting is not suited for functional parts due to the brittleness due to UV degradation of the materials available. Support material is also required for this method.
Binder Jetting
Binder jetting is similar to material jetting, whereby a moving nozzle deposits droplets of binding material (essentially glue) onto a bed of powder. After each layer is bound, the powder bed drops down, and a new layer of powder is spread on top. Layer thicknesses depend on the chosen material and the powder particles' size.
Ink can also be mixed with the binder to produce multicolour parts. Furthermore, whilst the material choices are limited, it is also possible to make metal parts using this process. However, both plastic and metal parts produced using this process will have poor mechanical properties due to the porosity and mechanical properties of the binder material itself.
Binder jetting is typically a faster process than material jetting, so it often produces parts at a much lower cost.
What are the Advantages of 3D Printing?
✅ Geometrical complexity at no extra cost
Due to the flexible nature of additive manufacturing, complex parts are easier and less costly to produce compared to other manufacturing technologies. Also, complex features that would be impossible to manufacture
✅ No tooling costs
With casting or forming processes, complex parts will require complex moulds to be created or multiple machining operations in the case of subtractive processes. 3D printing often only requires one operation with no tooling or setup costs.
✅ Decreased development time
With low-cost prototyping and comparably fast lead times, the design cycle is accelerated. Each iteration of part can take as little as a few days from design to prototype; for this reason that 3D printing is classed as a rapid prototyping process, allowing design teams to test and prove ideas before committing to a larger scale manufacturing process injection moulding.
What are the Disadvantages of 3D Printing?
❌ Less cost-competitive at higher volumes
Although the lack of custom tools and moulds means that start-up costs are low for 3D printing, production volumes need to remain small for the process to be cost-effective. Due to the economies of scale of other manufacturing techniques especially casting processes, 3D printing cannot compete for high volume parts, except for parts of extreme technical complexity.
❌ Limited accuracy and tolerances
The fundamental technology and layer heights of a particular 3D printing process mean that although suitable for some applications, 3D printing cannot offer the same level of accuracy as other manufacturing processes such as CNC machining. 3D printed metal parts often need additional machining or post-processing to improve finishes and tolerances.
❌ Lower strength
Depending on the 3D printing process used, finished parts are often more brittle or weaker than other manufacturing processes. This is because the design has been completed layer by layer, which introduces weaknesses between the layers. This is less of a problem with non-functional prototypes, however, this is an important consideration for parts that are used in more essential, mission-critical applications.
3D Printing Design Guidelines
This section will outline some of the key design considerations that will help improve the manufacturability of your part, resulting in higher quality parts at a more competitive price.
Wall Thickness (Supported wall)
The wall thickness is the distance between one surface of a 3D model to its opposite surface. A supported wall is connected to the rest of the part on two or more surfaces. It has a minimum thickness it can be printed without warping.

FDM: 1.0 mm
SLA: 0.5 mm
SLS: 0.8 mm
DMLS: 0.3 mm
Wall Thickness (Unsupported wall)
The wall thickness is the distance between one surface of a 3D model to its opposite surface. An unsupported wall is connected to the rest of the part by only one surface. It has a minimum thickness it can be printed without warping.

FDM: 1.2 mm
SLA: 1.0 mm
SLS: 0.8 mm
DMLS: 0.4 mm
Overhang Length
An overhang is a feature that extends out horizontally from a part without any support provided underneath. An overhang has a maximum distance. It can be printed without the need for support material.

FDM: 1.2 mm
SLA: Always required
SLS: Supports not required
DMLS: 0.5 mm
Overhang Angle
An overhang is a feature that extends out horizontally from a part without any support provided underneath. An overhang has a minimum angle. It can be printed without the need for support material.

FDM: 45 degrees
SLA: Supports always required
SLS: Supports not required
DMLS: 45 degrees
Horizontal Bridge
A horizontal bridge connects two vertical structures without any support underneath. There is a maximum distance the bridge can span without the need for support material underneath.

FDM: 12 mm
SLA: 20 mm
SLS: Supports not required
DMLS: 2 mm
Pin Diameter
A pin is a tall thin feature with a circular cross-sectional area. There is a minimum diameter a pin can be printed without a build failure.

FDM: 2.5 mm
SLA: 0.4 mm
SLS: 0.8 mm
DMLS: 1.0 mm
Engraved Detail
An engraved detail is a recessed feature below the surface of a part. Recesses have a minimum depth; otherwise, they will not be visible due to a process's layer height.

FDM: 1.2 mm
SLA: 0.3 mm
SLS: 0.8 mm
DMLS: 0.2 mm
Embossed Detail
An embossed detail is a shallow feature that protrudes from the surface of a part. Embossed detail has a minimum height. Otherwise, they will not be visible due to a process's layer height.

FDM: 1.2 mm
SLA: 0.3 mm
SLS: 0.8 mm
DMLS: 0.2 mm
Moving Parts
Moving parts are two or more individual parts that are printed on the same print bed. A minimum clearance distance is required for the parts to move freely and not fuse.

FDM: 0.8 mm
SLA: 0.5 mm
SLS: 0.8 mm
DMLS: 0.5 mm
Hole Diameter
Holes have a minimum diameter. They can be printed without the risk of the hole closing during printing.

FDM: 2.0 mm
SLA: 0.4 mm
SLS: 1.6 mm
DMLS: 0.1 mm
3D Printing Materials
When selecting a material, it is essential to consider the mechanical properties, surface finishing, manufacturability characteristics and cost. A wide range of materials can be used in 3D printing, best suited to specific printing methods. Get It Made offers three main categories of materials: Plastics, Metals and Resins; please see the table below for a sample of the materials we work with. If you require material that is not on this list, please get in touch as we can likely source it for you.
Plastics
Plastics are the most commonly used material in 3D printing due to their low cost, durability, versatility and ease of manufacture. They can be found in different forms, the most common being in a filament used in FDM. This combination of material type and manufacturing method is often used for prototyping due to its low cost. Plastics can also be found in powder form for SLS which is better suited for end-use products as it offers better accuracy and part detail. The other two additive methods that use plastics are material jetting and binder jetting. The most common plastics used are listed below:
ABS
Acrylonitrile Butadiene Styrene (ABS) in filament form is the most commonly used plastic in 3D printing. It also comes in powder form for SLS and liquid form for SLA. The material has high tensile strength with excellent resistance to physical impacts and chemical corrosion. It has a nice glossy finish and is used in a broad range of industries. The disadvantages are it's not biodegradable and is prone to warping when printing without careful consideration.

✅ High strength
✅ Chemical corrosion resistant
❌ Not suitable for high-temperature environments
❌ Poor fatigue resistance
PLA
Polylactic acid (PLA) is used with FDM and is becoming very popular for rapid prototyping as it has the amazing benefit of being biodegradable! Most plastics are made from synthetic compounds (petrochemicals); however, PLA is made from organic sources such as corn starch. It is easy to print and comes in a wide range of colours. The downsides are it has low mechanical strength and part detail.

✅ Biodegradable unlike most 3D printing materials
✅ Wide range of colours available
❌ Not suitable for highly detailed parts
❌ Poor mechanical properties
Nylon
Nylon can be found in filament and powder form; the latter is more popular combined with SLS. The material has excellent mechanical strength and wear performance while lightweight, making it a perfect choice for moving parts such as cogs and bearings. Its resistance to most chemicals is good. However, it does have high moisture absorption affecting dimensional stability over time.

✅ Good strength to weight ratio
✅ Excellent wear performance
❌ Poor UV resistance
❌ Heat sensitive
Metals
3D printed metals have a unique position in manufacturing as they combine the design flexibility of 3D printing with the mechanical characteristics of metal. They are used for fully functional prototypes to end-use products. SLS in metal is often best suited when a design is complex as it can simplify the manufacturing process and reduce waste. For example, the aerospace industry has adopted SLS in metal as parts can be designed with an internal lattice to have an excellent strength-to-weight ratio. The most common metals used are outlined below:
Aluminium
Aluminium is the most commonly used metal in 3D printing as it offers a great strength-to-weight ratio, is non-corrosive, non-magnetic and has good heat/electrical conductivity. It also is the most affordable metal. Parts printed in this material can be subjected to a wide range of finishing methods such as machining, heat treatment, welding, bead blasting, polishing and coating.

✅ Great mechanical properties and can be anodised
✅ Cost-effective material
❌ Sensitive to heat
❌ Not as strong as stainless steel
Titanium
Titanium is lightweight and has high tensile strength; it offers an improved strength-to-weight ratio to aluminium. It is biocompatible and, combined with the ability to manufacture tiny detailed parts, makes 3D printed titanium popular in the medical industry for implants. The material is also popular in the aerospace industry for its lightweight properties and stability at elevated temperatures.

✅ Highest strength to weight ratio of any metal
✅ Corrosion resistant
❌ Expensive
❌ Not suitable for high-temperature environments (+ 400 degrees celsius)
Stainless steel
Printing in stainless steel creates parts with excellent corrosion resistance, high strength and good ductility. Its corrosion resistance properties make it well suited for the food industry. Parts can undergo a range of finishing processes such as machining, bead blasting, polishing, coating and welding.

✅ Excellent mechanical properties
✅ Corrosion resistant
❌ More expensive than aluminium
❌ Cannot be anodised
Resins
Resins used in 3D printing are liquid photopolymers that solidify when exposed to a light source, often in the form of a laser or LCD screen. The two most common methods that use resins are SLA and Material Jetting. Parts created from resins characteristically have high detail with a nice smooth surface finish. The downsides of resins are they don't have the best mechanical properties and the colour options are still quite limited. Also, there have been recent studies to show that some resins can be toxic to the aquatic ecosystem but there are eco-friendly resins available.
Standard Resin
A standard resin has excellent dimension stability, a smooth surface finish, and fairly tough. The combination of production method (SLA) and material make for very cost-effective parts. This type of material is best suited for prototypes with a high feature detail that are not load-bearing. If walls are printed too thin, they can be soft and flexible. Often parts are white with a slight yellow tinge to them.

✅ Cheaper than other resins
✅ Good part detail
❌ Part walls can be soft
❌ Expensive
High-strength Resin
A resin such as Somos® Taurus has great strength and durability paired with heat tolerance up to 60 degrees celsius which sets it apart from traditional resins. It also exhibits isotropic mechanical properties which means it has identical material properties in all directions, uncommon in 3D printing. These characteristics make this resin a popular choice for demanding functional prototypes and end-use products. The downside of this resin is it isn't very effective at printing small deatiled features.

✅ Excellent mechanical properties
✅ High temperature resistance for a resin
❌ Not suitable for very detailed parts
❌ Expensive
Transparent Resin
Transparent resin can undergo post-processing steps of sanding, polishing and UV treatment to achieve a very smooth, optically transparent finish. It also has great dimensional stability and water resistance. The material is commonly used for model verification for transparent parts and can also be used for end products. The main disadvantages are small bubbles can be present in parts and complex designs cannot be polished optically transparent.
✅ Optically transparent finish
✅ Water resistant
❌ More expensive than other resins
❌ Little bubbles can be present in the material
Carbon Fibre
Carbon fibres can be incorporated into an FDM filament material such as ABS to improve its mechanical properties. The fibres increase the strength-weight ratio, stiffness and dimensional stability of a part, making them more suitable for end-use products. However, the added carbon fibres can introduce printing complications, which increases the cost. Parts printed using this material can often be found on UAVs/drones due to their excellent mechanical properties.
Cost Reduction Tips For 3D Printing
This section will outline some simple adjustments that can be made to help reduce the overall cost of your part. Three main areas will significantly affect the cost of your part:
- Design - Solid designs with a lot of material are expensive.
- Material/Process - The cost of the bulk material and the additive process chosen.
- Quantity - Cost per unit reduces with an increase in quantity due to fixed setup costs.
Design
Hollow Out Your Part
A significant proportion of the costs involved in 3D printing is related to the amount of material used. An effective way to reduce the amount of material used is to hollow out the centre of your design to create an outer shell. Pay careful attention to the wall thickness as if you go too thin the part will lose its structural integrity. If you are using a powder process such as SLS be sure to include escape holes for the powder otherwise it’ll remain stuck inside your part!
Incorporate a Lattice
Another option is to replace solid features in your design with an internal lattice. Lattices are great as they can reduce the amount of material used without compromising the structural strength of your part substantially. Most CAD software will allow you to incorporate a basic lattice into your design known as percentage infill. Again if you are using a powder process such as SLS, you will need to include escape holes for the powder.
Reduce Part Size
The part size directly correlates to the cost as a bigger part requires more material and an increased print time. If you are manufacturing a design for proof of concept, consider scaling down the model size to reduce cost and lead time. This will allow you to get through the prototyping phase faster and cheaper than a full-scale design.
Optimise Your Design
The main drivers of cost for 3D printing are the amount of material used and the manufacturing time. Therefore, unlike a traditional manufacturing process such as CNC machining, adding extra holes to your part can reduce the part cost instead of increasing it! This is because less material is used with a reduced production time.
Reduce the Number of Support Structures
Reducing the amount of post-processing your parts require can help keep the costs down. For methods such as FDM and SLA, removing support structures can be a tricky and time-consuming process. NETFABB is a great tool to help orientate your part to minimise the support structures, saving you time and money. You don't need to worry about support structures using SLS.
Material/Process
The cost of 3D printing materials varies considerably, so it is important to work out your material requirements so you don't spend more than you need to. For example, if you are testing the form of a prototype, there is no need to print in stainless steel when a simple thermoplastic is sufficient. This is because the material costs of a stainless steel powder for SLS are far greater than the cost of a thermoplastic filament used in FDM.
The table below shows the average raw material costs for each 3D-printing process. There is an overlap in material costs between the manufacturing types; however, the table can be used as a rough guide on material prices.
3D-Printing ProcessAverage raw material cost (£) as of 2022Fused Deposition Modelling50 per kgBinder Jetting100 per kgStereolithography200 per LMaterial Jetting300 per kgSelective Laser Sintering500 per kg
Quantity
Unit cost can be reduced slightly by simply increasing the order volume of your part. Our manufacturing team needs to programme the machine, set up the part, and perform a varying degree of post-production finishing, which is a fixed cost. The fixed cost can be shared across all the parts by manufacturing multiple parts simultaneously, making each part more economical.
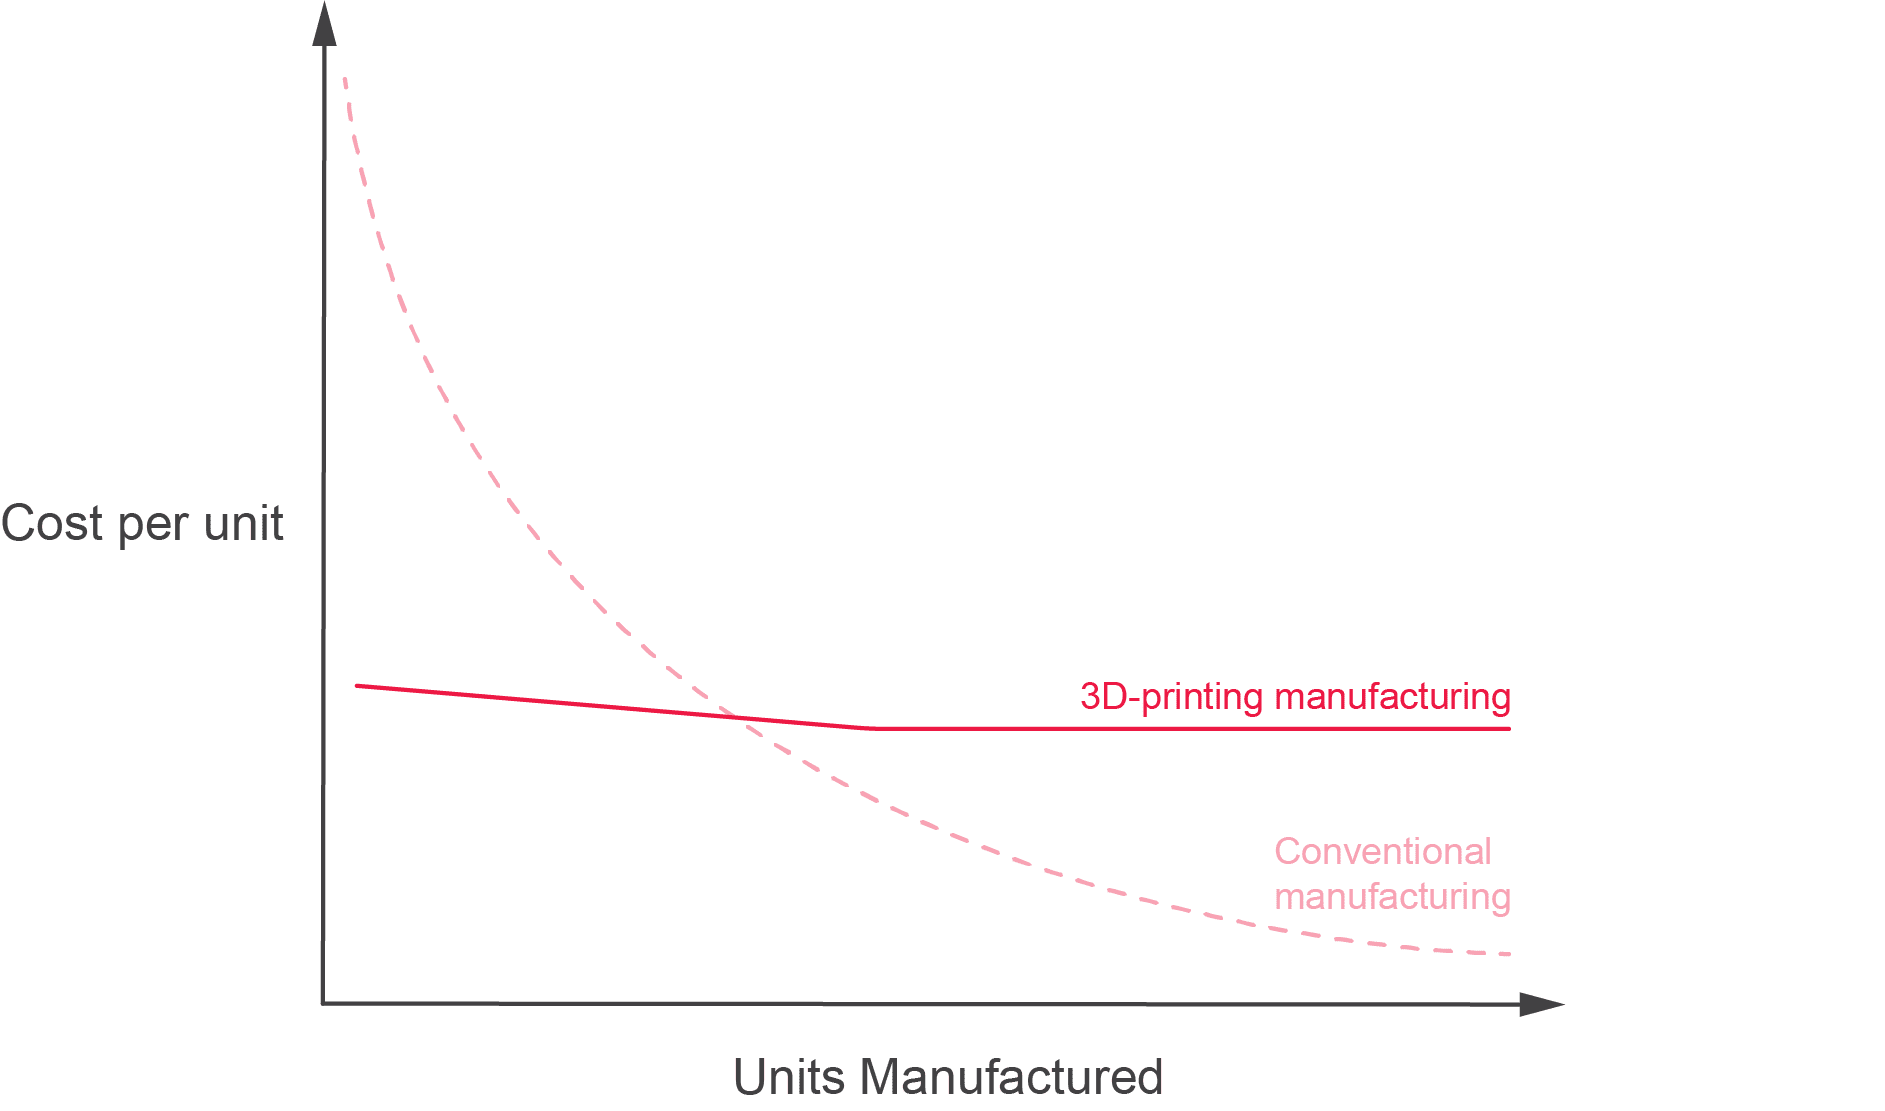
3D printing is an excellent option for low-medium volume production; however, moving into high-volume production, CNC machining and injection moulding becomes a more cost-effective means of production. See the graph for a visual representation of economies of scale.
Getting Your Part Made
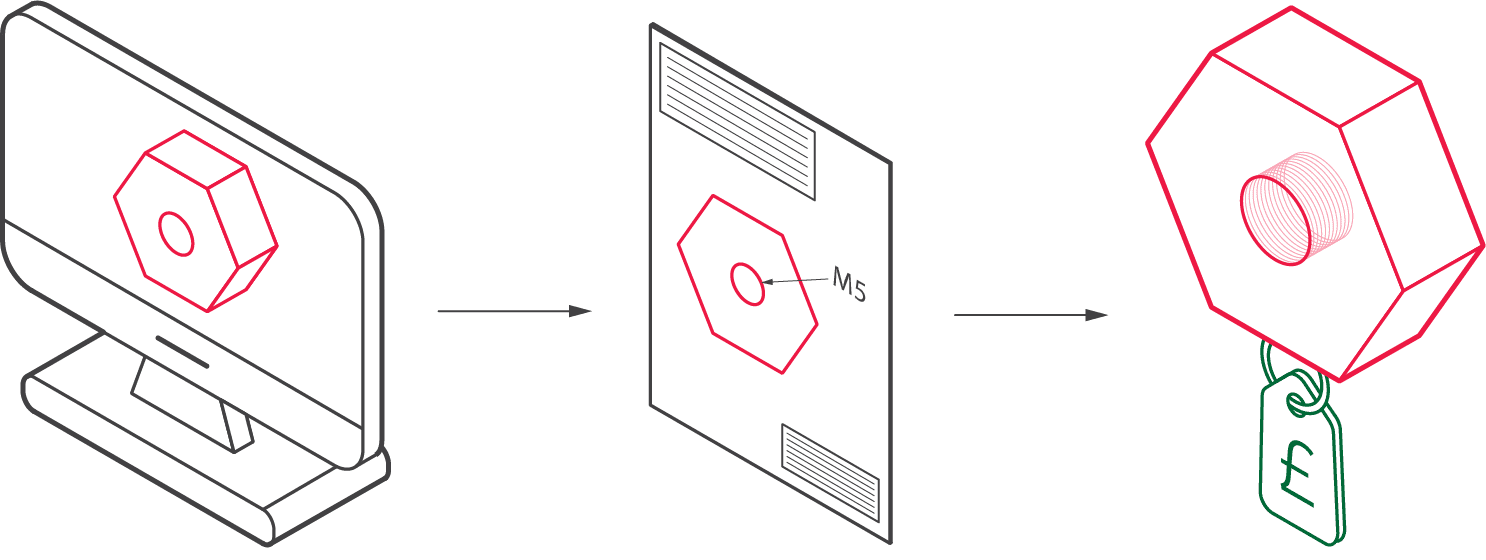
1) Design and Export your CAD File
Use the 3D Printing Design Guidelines to help design your parts for machining. Then please export your 3D CAD files to STEP, IGS or PARASOLID format. We can accept STL files for 3D printing projects. We cannot accept OBJ files as they do not correct geometric data for manufacturing.
2) Create an Engineering Drawing
We highly recommend sending supporting PDF Engineering Drawings for each part. This is required when a part has: thread holes, critical dimensions, tolerances, specific finishing requirements. We can accept an annotated screenshot in some circumstances, such as highlighting a threaded hole.
3) Get a Quote in 24 hours
Please request a free quote today, and one of our engineers will personally review your project within 24 hours. They will then help fine-tune your project to ensure you get the best possible price and lead time for your 3D Printed parts!
3D printing technology is continually evolving, and machine and material prices have become more economical. When considering 3D printing for your next project, take the time to speak with experts such as Get It Made to discuss the right 3D printing process for you.
You can explore Get it Made’s 3D printing services on our website, or head to our blog for more information and insight about our range of services.

Has a degree in Aerospace Engineering and is a Bike fanatic 🚴🏼


Need custom metal and plastic parts?
Get 10% off your first order
No newsletter, no marketing, just a discount code for custom parts.


